The Model tab contains commands for working with models; this can be found to the left in the program window's ribbon.
Overview
The Model tab can be found on the left-hand side in the program window's ribbon.
In the command overview of the quick access toolbar, the Model tab is called the application menu.
Backstage opens if you click on the Model tab. This contains menu commands and various backstage views, one of which is always in the foreground.
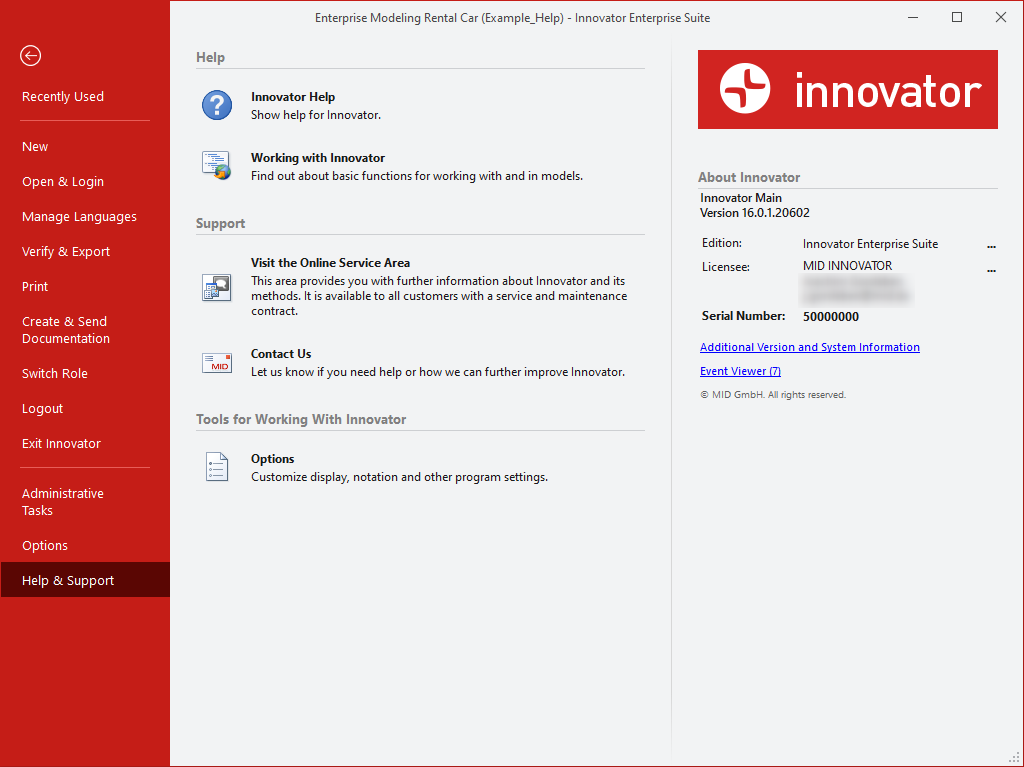
The figure shows the Model tab with the Help & Support backstage view.
Note
You can quickly jump from the backstage view to your model by clicking on the Start tab or pressing the [Esc] key.
Content
The ribbon contains commands for working in a model, whereas the Model tab contains commands for working with a model.
This is why the Model tab contains model-based commands and backstage views for various aspects of an Innovator model:
The documents which were last edited in this model can be seen in the Recently Used backstage view.
You can find Recently Used Diagrams on the Start Page.
Recently Edited in this Model
Clicking on an item in the Recently Edited in this Model list reopens the corresponding document.
You can add the document to the list of recently edited documents by clicking on the  button or remove it from the list by clicking on the
  button.
The following commands are available to you in the context menu:
- Open
- Pin to list
- Remove from List
- Remove unpinned entries from list
The backstage view is only available if the change logging for the model in the Administrative Tasks backstage view was activated.
Use Display in the Options dialog to set in models with the activated Change Sets backstage that this backstage view is shown upon login.
Change sets are used to log model modifications such as creating, deleting and modifying elements, properties or specification texts.
Each user always works in precisely one change set if change sets are active. This then records the user's changes to the model. Multiple users can share a change set.
Note
Only the model administrator can set change sets in the Administrative Tasks backstage view.
A user's active change set records all relevant changes that they make to this model.
-
Change Sets
The overview contains the following specifications for each change set:
-
Status
Specifies whether the current user (green point with user icon) or another user (green point) is currently working in this change set or that the change set is sealed (lock, gray text)
-
Change Sets
Specifies which change sets have been created or edited by other users since your last login.
-
Started at
Date change set was created
-
Finished at
When the change set was completed. This entry is always empty for active change sets.
-
User
User names of the users currently recording changes in this change set; anonymization can be configured for change logging
-
Name
Name of the change set to enable clear identification of it
-
Comment
Comment about the change set for the characterization of set operations
-
Operations
Number of performed operations and modeling steps
-
Link
Links to connected tasks can be set in theNew and Properties dialogs.
-
-
You can use the Advanced Filter Options to restrict the display in the overview.
Note
The filter is saved in all models and restored once restart has taken place. This comprises both extended filter options and the text filter.
-
Only active change sets
Show active change sets only.
-
Only change sets with own participation
Show change sets with own participation only.
-
Show sealed change sets
Show also sealed change sets.
-
Interval of the start date from/to
Set period of time of the start date. Deleting the value 'to' means up to today.
-
Interval of the end date from/to
Set period of time of the end date. Deleting the value 'to' means up to today.
-
-
You use the Continue button to continue editing the model in the active change set.
-
You can use the New button to create a new change set in a dialog so that you can then work in it. The previous change set is closed if no other user is using it anymore. Empty change sets are deleted.
-
If you have the View Change Logs privilege due to your user role or because you are in administrator mode, you can use the Details button to open the Change Set window, which displays details about the various changes.
-
You can use the Merge button to copy all changes in the previous change set to the selected change set. You and all other involved users then work in the selected set. The previous change set is then deleted.
-
You can use the Join button to leave the previous change set and participate in another existing change set. The previous change set is closed if no other user is using it anymore. Empty change sets are deleted.
-
You can use the Properties button to open a dialog in order to change the name or comment for the currently active change set.
-
You use the Delete button to irrevocably delete the selected change sets after confirming a security prompt. You can only delete completed change sets. This command requires the Delete Change Sets privilege.
-
Use the Seal button to close the selected change set. No further changes can be made to the change set. You cannot seal active change sets. The change set can only be reopened by the model administrator.
You can create new models in the New backstage view. The creation is structured into two areas depending o the type of management:
- Model File
- Standalone Model
- Managed Model
Click on the respective tab to expand the respective tab.
Note
This area is only active if the Innovator server component is installed on your computer and you have the authorization for running an Innovator server process.
You can select the template you want for the model in the Available Templates for Model Files area. What the template is used for is shown to the right for a selected template.
Create a model file by clicking on the Create button. The name is automatically assigned.
- If you are already logged-in to a model, then another Innovator interface is started for the new model.
- If the selected model template provides more than one user role, the Switch Role dialog appears. Select a role and confirm with OK.
The new model can then be edited. Unlike with models in the network, (see below) you need to save the model data yourself.
The Available Repositories for Models area lists the active model servers of the set license server. If applicable, these can be found in a project directory's sub directories ($INOPRJ).
Clicking on the Active model servers on '{0}.{1}' button refreshes the active repository's display ({0} is the license server (INOHOST) and {1} its port address).
The list of models in the network is structured as follows:
| Column | Description |
|---|---|
| Name |
|
| Providing Computer | Computer the model server is active on |
| Operator |
|
 Subdirectory in the project directory (INOPRJ)
 Model Server (Repository)
The columns can be sorted.
A standalone model can only be created on an active model server in the network. The model requires a unique name on this repository. However, models with the same name can exist on other repositories.
You need to enter the repository administrator's password on a non-single sign-on repository to create a new model.
Clicking on the Model Wizard button opens the wizard for creating a model in the selected repository. Wizard guides you through the three steps.
The Create Managed Model is used for creating new managed models in their first version.
Clicking on the Model Wizard button opens the wizard for creating a managed model. Wizard guides you through the necessary steps.
You can find your models in the Open & Login backstage view. Depending on their type of management, the models are split into expandable areas:
- Recently Used Models
- Model File on this Computer
- Model Servers in the Network
These areas contains commands for searching and opening models and/or logging-in to a model of the respective area.
Note
Backstage view is limited to model servers (repositories) which contain models and to models which you can log-in to.
The area shows the set license server's (INOHOST) models last used.
You can carry out the following actions:
-
If you have do not have a model open yet, you can open this model again by clicking on the respective entry in the Recently Used Models list.
The model is opened in its own Innovator interface. Please wait until this appears.
-
If you already have a model open, then you can add a model in an active repository to the list of recently-used models by clicking on the
button or remove it from the list by clicking on the button.
The following commands are available to you in the context menu:
- Open Model (Enter)
- Pin to list
- Remove from List
- Remove unpinned entries from list
Note
This area is only active if the Innovator server components are installed on your computer.
The default storage location for models managed on your computer is the "Innovator\<Version number>" sub directory of your Windows default folder My Files (Documents).
Clicking on the Browse... button opens the standard dialog for opening a file with a filter for Innovator model files (*.inomdl). Select a model and confirm with Open.
Folders with model files are collected as Recently searched Folders in the Model File area.
If this model file has more than one user role, the Switch Role dialog asks you to choose one of these roles. Select a role and confirm with OK.
Models available in your organization's network that were prepared by the active independent model servers (repositories) or managed models of the set license server and the other available license server of the same version are shown.
If applicable, existing sub directories of the project directory ($INOPRJ), the model server and their models are shown for independent models in the tree structure. The managed models and hierarchy of the active and inactive model versions are shown for the managed models.
The list of models in your company's network is structured as follows:
| Column | Description |
|---|---|
| Name |
|
| Last login | Date of your last login to this model |
| Last Role | Your last role in this model |
 Standalone Model
 Managed Model
The content in this list can be sorted by each of these three columns.
- If multiple license servers are available, then the Project drop-down list is shown in the header.
- Clicking on the Reload Content button refreshes the active repository's display and the models managed there ({0} is the license server (INOHOST) and {1} its port address).
- You can search for models and repositories by their name in the <Find Model> search field. In this case, the list is limited to the models with the path/repository/model name entered in the search.
If you enter more than one search term separated by spaces, then all search terms need to appear in the path/repository/model name.
The following information appears about the selected independent model or managed model version to the right of the list, apart from the model icon.
| Information | Description |
|---|---|
| Name | Name of the model |
| Purpose | Brief description of the model (Purpose of the model property) |
| Last Login | Date of your last login to the model |
| From Computer | Computer which the last login was carried out from |
| As User | User who last logged-in to the model |
| Last Role | Role the last login to the model was in |
| Repository or managed model | Repository the model is managed in |
| Providing Computer | Computer the model server is active on |
| Operator |
|
| Optional Note | Information about the reason for missing log-in options for a model |
The Open button is activated if you selected a model.
- Selecting a model you have not logged-in to yet opens the dialog of the same name; you need to select the user and role for the login and enter the allocated password to login in this dialog.
- If you select a model you are already logged-in to, then you can switch to the model's Innovator interface.
If you have opened a model file, this command then saves the current model.
If you have opened a model file, this command opens the standard dialog for saving a file; you can then select the directory and name for the copy of the current model file.
The Manage Languages backstage view contains commands which can only be accessed by a model administrator or a user with special privileges:
The backstage view can be seen once you have logged-in to a model.
Manage Languages
-
Administrator Mode
Standard users can temporarily activate model administrator mode.
Note
- This mode is permanently activated for the Model Administrator role and cannot be deactivated.
- This mode is permanently deactivated for the Guest role and roles with read-only rights and cannot be activated.
- Please note that the mode is not automatically limited to a certain time period. You need to log-out once you have completed your administrative tasks. It is not a good idea to work as the Model Administrator user as model elements created by the model administrator cannot be accessed by any users.
Click on the Administrator Mode button to activate administrator mode. You require a model admin rule in single sign-on models. For non-single sign-on models, open the Get Temporary Administrator Privileges dialog by entering Model Administrator Password.
Click on the Administrator Mode button to stop administrator mode. You will then have the rights of your user role once again.
-
Set the modeling language
This command can only be carried out by users with model administrator rights.
Can only be carried out when starting modeling, so that you can set the language for the model editor.
Select the model language in the dialog.
Defines the language which is used in the model editor for model elements when no display language is selected.
Click on the Model Language button to open the Model Language dialog.
-
Manage Alternative Display Languages for Model Elements
This command can only be carried out by users with model administrator rights.
Model content can be shown with the display languages or another language that you as model administrator manage here. The alternative display languages currently available are listed in the dialog.
You can use the active display languages to set the language which model content should be translated into.
The respective display language currently shown is used for all translated model elements and controls e.g. how hyphenation is used in translated diagrams. It is also used for language-specific exports.
Click on the Display Languages button to open the Display Languages dialog. Add or remove active display languages in the dialog.
Translation
Note
These commands are only available for users in a role with the privilege Translate Model Elements.
-
Export translation files
Opens a wizard for creating a translation file. The languages and the model elements to be translated can be selected.
The Translation File Creation Wizard takes you through the export process step-by-step.
Please read about the general procedure in the "Translation Scenarios" chapter.
-
Import translation files
Opens a dialog for selection of the translation file to be imported. All model elements found in the file will receive the translations of the detected languages.
Depending on the file content, you may require certain rights when importing; you may require e.g. the Configure privilege when importing configuration content.
The Verify & Export backstage view contains commands used for preparing and verifying versioning, exporting or documentation, as well as the command for migrating a model file.
The backstage view can be seen once you have logged-in to a model.
Verify Model
With a model verification, you prepare your model for versioning, export or documentation.
To obtain good model quality, you should ensure the following:
-
During the verification of the model, no messages that are classified as errors should occur.
To check this, select Check Model Quality>Verify Model...
The Model Verification Wizard is called.
-
The model should not contain any annotations that have not been taken into account.
To check this, select Check Model Quality>Find Diagrams with Annotations
Diagrams with annotations are added to the result region. Jump to the Result Region to open and check the diagrams with annotations.
Convert Model
These commands require the Export Models privilege.
Save the current model as a model file
Make the entire model available as a model file.
The Convert to Model File command can only be active in repository models.
You can save the current model (of a repository) as a model file in a target directory in the standard Save As dialog.
You can open model files in the Model File area in the Open & Login backstage view.
Saving the Current Model File as a Repository
Make the model file available as a separate repository.
The Convert to Repository... command can only be active in model files.
You can save the current model as a separate repository in a target directory in the Convert to Repository... dialog. Please bear this naming convention in mind for repositories: [A-Za-z][A-Za-z0-9_]*
Start a repository with the Model Server.
Properties
The Properties area displays the metadata of a model such as its creation date and provider (for services, for example, "system").
The purpose is a model property that is also displayed for the selected model root in the Properties tool window.
The Manage Versions backstage view can be seen once you have logged-in to a managed model.
A change set records modifications to a model such as the creation, deletion and changing of elements, properties and specification texts. A new version or back-up can also be created.
The commands are the same as those in the administration program.
Manage Versions
The managed model's model version tree is shown in the left-hand area.
The Reload Content button refreshes the tree.
The Inactive Model Versions and Inactive Backups buttons affect how inactive model versions or back-ups are shown or hidden.
(see "Icons in the Version Tree" for icons in the tree)
Metadata about model versions is shown in the Properties area at the top right-hand, including creation date and description.
The following functions are included below this to manage the managed model's versions:
-
Open Model Version
Open the selected model version in a new model editor.
-
Start Model Version *
The selected model version is started. Activate Inactive Model Versions if you cannot see the version you require.
-
Close Model Version*
The selected model version is closed after a prompt.
-
Create New Version
Create a successor or sub version from the selected model version using a wizard.
-
Create Back-Up*
Create a back-up from the selected model version using a wizard. You can use this backup in read-only mode only.
*A suitable version rule is required.
You can print documents (diagrams, specification texts) which are selected or opened in the Print backstage view.
The backstage view can be seen once you have logged-in to a model. The structure is the same as the Microsoft Office standard.
Start printing with the current settings by clicking on the Print button.
You can select the printer from the Printer drop-down list. The Printer Properties link opens the standard dialog of the same name.
Select the scope and format of the print task in the Settings area.
You can select one of the basic options for the scope:
-
Print active diagram
Only print active diagrams.
-
Print all open diagrams
All open diagrams will be printed.
-
Print all selected diagrams
All diagrams selected will be printed.
The following options can also be selected:
- Page selection (from, to; refers to the preview page numbers bottom right)
- Orientation (portrait or landscape)
- Format (for selecting the paper size for the paper format supported by Innovator (DIN/ISO format A1 to A6, B5 and North American paper formats Executive, Letter, Legal and Ledger) and that of the printer currently selected.)
- Always fit Diagrams to single Page
- Scaling ( Scale to one single page, No scaling)
The Page setup link opens the dialog of the same name with the Paper size, Page margins, and Templates tabs.
The Create & Send Documentation backstage view contains commands for publishing model contents, meaning non-Innovator users can also access the models.
The backstage view can be seen once you have logged-in to a model.
Publish Model Documentation
You can create documentation which contains all or partial information from a model at a particular development state using Innovator. Documentation generation settings such as e.g. the output format you want, are available as so-called "documentation commands".
The following functions exist for generating a documentation:
-
Microsoft Office Word Document
The As Word Document function can be used if configuration of your model has at least one documentation command which can be used to create the "Word for Windows" output format.
Clicking on the
 As Word Document button starts the documentation generation wizard; this then provides you with the Word documentation commands available and takes you through the steps necessary for generating a Word document.
 -
XML File / HTML Pages
The As XML/HTML function can be used if configuration of your model has at least one documentation command which can be used to create the "XML" output format.
Clicking on the
 As XML/HTML button starts the documentation generation wizard; this then provides you with the available XML/HTML documentation commands to choose from and takes you through the steps necessary for generating an XML/HTML document.
 -
Document Preview
The Preview function can be used if configuration of your model has at least one documentation command which can be used to create the "Preview Window" output format.
Clicking on the
 Preview button starts the documentation generation wizard; this then provides you with the preview documentation commands available and takes you through the steps necessary for generating a document preview.
 -
Use Documentation Creation Wizard
The Docu Wizard function can be used if your model configuration has at least one documentation command which can be used to create any output format.
Clicking on the
 Docu Wizard button starts the documentation generation wizard; this then provides you with all documentation commands available and takes you through the steps necessary for generating a document.
Reapply
Clicking on the  Redo Generation button uses the settings last used for the Documentation Creation Wizard to structure documentation for the same model elements The wizard does not restart and the same documentation is immediately created.
Send by e-mail
These commands create a new e-mail draft with files attached in a certain format. You can edit this draft before sending it to the desired recipient as an e-mail.
Note
The functions for sending files in e-mails uses the Outlook Mail API; Microsoft Outlook 2003 (or newer) needs to be installed for it to work.
-
Portable Network Graphics (PNG) File
Clicking on the
 Send as PNG button creates a file in PNG format for each diagram which belongs to the current selection in the application's active window and attaches this to the e-mail.
 -
Enhanced Metafile Format (EMF) File
Clicking on the
 Send as EMF button creates a file in EMF format for each diagram which belongs to the current selection in the application's active window to add as an attachment in the e-mail.
 -
Innovator Model Fragment
Clicking on the
 Send as Attachment button creates a file in Innovator's own AOB format and attach to an e-mail; the contents corresponds to the current selection in the application's active window.
This command opens the dialog for selecting the role.
This command logs the user out and closes the active model. This does not close the Innovator model editor.
If you have opened a model file, this command then closes the current model.
This command logs the user out from all open models, releases all documents and elements, and closes all model editors.
The Administrative Tasks backstage view contains commands which can only be accessed by a model administrator or a user with special privileges:
The backstage view can be seen once you have logged-in to a model.
Administrative Tasks
-
Administrator Mode
Standard users can temporarily activate model administrator mode.
Note
- This mode is permanently activated for the Model Administrator role and cannot be deactivated.
- This mode is permanently deactivated for the Guest role and roles with read-only rights and cannot be activated.
- Please note that the mode is not automatically limited to a certain time period. You need to log-out once you have completed your administrative tasks. It is not a good idea to work as the Model Administrator user as model elements created by the model administrator cannot be accessed by any users.
Click on the Administrator Mode button to activate administrator mode. You require a model admin rule in single sign-on models. For non-single sign-on models, open the Get Temporary Administrator Privileges dialog by entering Model Administrator Password.
Click on the Administrator Mode button to stop administrator mode. You will then have the rights of your user role once again.
-
Switching to the Administration Program
Open the Innovator administration program or bring it to the forefront.
You can only open the administration program if it is installed on the respective computer.
-
Updating Profiles and Application Configurations
These commands are only available for users with model administrator privileges.
You can also update profiles and application configurations when a full migration is carried out.
Open the Update Configuration... dialog where profiles and application configurations can be updated using migration files.
-
Change the Name of this Model
This command can only be carried out by users with model administrator rights and only in standalone models.
Existing references to elements of this model will no longer work after renaming!
Clicking on the Rename Model button opens the Change the name of the model dialog, where you can rename the model.
-
Setting Change Logging
These commands are only available for users with model administrator privileges.
Activate, deactivate, limit or delete all change sets in the dialog (only possible if change logging is not active).
Model Configuration
-
Edit the Model's Configuration
Model configuration contains profiles and documentation structures, as well as users and user roles.
Clicking on the
 Configure button opens the configuration editor. If one configuration element can be determined from the selection in the model it is then jumped to.
Note
Changes can be made in the configuration by the model administrator and by all users that are registered in a role with the Configure privilege.
-
Load and Save Model Templates
These commands can only be carried out by users with model administrator rights.
You can import add-on templates into a selected system model or save a model part as a base or add-on template.
The Load & Save button and commands are only activated in their submenu once an appropriate selection has been made in the model.
Select a system model in the model to be able to run the Load Add-On Template... command.
Select the model parts in the model you want to use for a base or add-on template to be able to run the Export to Model Template... command.
User Account
The user account shows the user currently logged-in and the role currently in use.
The current privileges are also listed. These are the rights for the role currently being used, including model administrator rights if applicable.
If you are logged-in to a model without single sign-on, you can Change Password here.
Current Logins
-
Log Out User
Log out the selected user.
Note
An other user can only be logged-out if you have model administrator rights.
You can use this command to log-out a user selected in the Current Logins list. Any unsaved changes made by the user are lost.
-
Current Logins
The users currently logged-in to the model are listed.
-
Authorized Users
Shows which users can log-in to the model in which roles.
Use this command to open the Authorized Users Dialog.
Note
You can only see the option to export users and their roles as a CSV file in the dialog if you have model administrator rights.
This command opens the Options dialog where you can make workspace-based settings for various areas of the interface.
The Help & Support backstage view contains functions to make it easier to use Innovator.
Help
- Click on the Innovator Help button to start your Internet browser and access the Help.
- Clicking on the Working with Innovator button starts your Internet browser to access a help topic and will help you with getting started with working with and in models.
- The third button Custom Help is determined by your setting for the URL for Custom Help in the Resources tab in the Options dialog. The set URL is called in your Internet browser.
Support
- Clicking on the Visit the Online Service Area button starts your Internet browser so you can access Innovator technical support.
- Clicking on the Contact Us button creates an e-mail with a question for the MID support team. You can edit this draft before sending it to MID support as an e-mail.
Tools for Working With Innovator
Clicking on the Options button opens the Options dialog, where you can customize workspace-based settings for various parts of the interface.
About Innovator
You can find information about your Innovator license here, including the precise version identification, serial number and host identification.
The About Innovator dialog contains information about the license, environment variables, operating system, hardware and assemblies. This information may help MID technical support to determine the reasons for errors. This information is not relevant when using Innovator.
It contains information about:
-
License
License holder, serial number, host ID (if applicable) etc.
-
User
Domain and system login for the current user
-
Environment Variables
Innovator environment variable values
-
System
Windows version, free RAM and rendering
-
Java
Active Java version, active Java directory, usable and installed Java versions etc.
-
Hardware
Graphics, CPU and RAM
-
Assemblies
Table of all program components with manufacturer, product version etc.
-
Active Plug-Ins
Table of all active plug-ins with their manufacturer and file and product versions
The Copy to Clipboard button allows you to copy the information into a document or an e-mail.
The Event Viewer dialog contains information about the last events.
Unusual events when running program code in the Innovator interface are logged in the Windows event viewer. It is also possible to have all events of the running interface listed in this dialog.
Use the Close button to end the dialog.
