You use the Align Models editor to determine the differences between model elements of the same type in a targeted manner and to compensate for them by means of a merge.
Purpose
The Align Models editor displays the differences between elements and enables compensation for them in Merge mode. Elements of the configuration can also be compared in Compare mode. Graphical and logical differences in diagrams can also be determined.
The root elements to be compared need to have the same element type for them to be able to be compared.
You can use the Compare mode for comparing an element from the current model with another element from the same model or from a different model.
You can use the Merge mode for comparing elements from two models; changes are always taken from the right-hand model.
Two root elements including all of their subelements or elements of a change set are compared and searched.
Prerequisites
Due to your currently used role you have the privilege Align Models.
Call
The call takes place with Review>Align>Align Models.
The Align Models editor opens as a document window.
The ribbon jumps to the Align Models tab.
Features
General
-
Automatic determination of the comparison option (different Innovator models preferably on the basis of the UUID, branches of an Innovator model on the basis of the namespace names with case sensitivity)
-
Automatic determination of associated root elements in the right-hand model using a button

-
Management of presets for left-hand and right-hand root elements and change sets and searches
-
Explicitly set that two elements to be compared should be viewed as the same element
 . (prerequisites: Both elements have the same element type and are flagged as left-hand and right-hand singles)
 -
Grouping together of structures of elements to be compared
-
Comparison and display of differences for the element selected in the tree
-
Indication that the right-hand element has a different user

-
Display of graphical and logical differences between diagrams in a separate comparison window
-
Display of differences between textual and multi-value properties in a separate comparison window
-
Via
 Settings
-
Filter elements with a certain element type
-
Filter specific elements (and subelements)
-
Filter properties of a certain type (property type)
-
Filter elements with a certain stereotype
-
-
User-defined settings (filters) can be
 managed and
  saved
saved -
You can select applications
 to compare file attachments
 -
 Search in the tree by name
 -
Selection of an element dragged and dropped into the Tree tab in the comparison result tree
Compare mode
-
Explicit definition that the
 configuration and/or
  model contents should be compared during the comparison of model roots
 -
Structures for the elements to be compared are displayed as a tree in the hierarchy level
-
The node icon in the hierarchy tree tells you whether the comparison elements are
 the same or
  different, and whether subelements are contained only in the
  left-hand model or only in the
  right-hand model
 -
Filtering in accordance with the comparison result
Merge mode
-
Automatic determination or explicit definition of a reference time for the comparison of the root elements
-
Structures for the elements to be compared are displayed as a tree in the hierarchy level
-
The icon of the node in the hierarchy tree tells you whether the comparison elements are
 new,
new,  deleted, or
  changed from the point of view of the right-hand model. The superimposed icon tells you whether the conflict is
  resolved or
  unresolved or whether the element was
  only changed in the left-hand model
 -
 Edited properties and
  conflicted elements or properties (due to differing configuration) are also marked
 -
Filtering in accordance with the comparison result; elements that are not displayed are not taken into account for the merge
Structure
The respective Align Models ribbon tab appears for the Align Models editor with the model elements to be compared and the comparison results. It is always the main focus if the editor becomes the active window.
The editor is split into a top selection area for setting the model elements to be compared and an evaluation area below it with a hierarchy and property area. Separate comparison windows can be called for textual and enumeration properties and for diagrams.
Figure: Align Models Editor Structure and Comparison Window
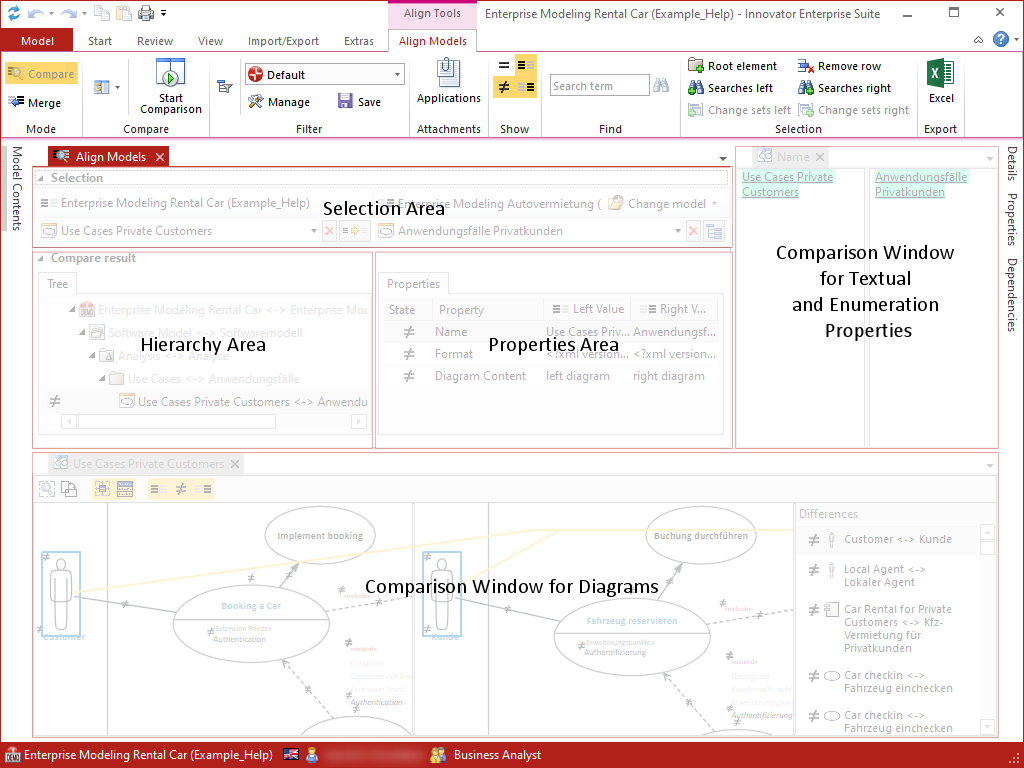
Selection Area
The Selection selection area in the editor's header shows the elements that you want to compare. The model which contains the element or elements is shown at the top. Below you will find the stereotype icon and the name of the root elements that should be compared or the change set or search from the comparison model.
Select  Root element in the context menu to compare multiple root elements.
Select  Change sets left or
  Change sets right in the context menu to compare change set elements.
Select  Searches left or
  Searches right in the context menu to compare search elements.
The left elements can only come from the model which the editor was opened for. The right elements can also be contained in exactly one other model. They must come from another model when in Merge mode.
The drop-down list offers all models located in the system models. This selection box is not available for the right element until you have logged-in to the right model.
Evaluation Area
The bottom evaluation area contains information once you carry out the comparison with the Align Models>Compare>Start Comparison (Ctrl+D) command.
The comparison must be repeated following a role change.
The evaluation area has two subareas.
Hierarchy Area
The left-hand area is the hierarchy area and contains a tree. In Merge mode, it also contains a list.
The root node always represents the open model. The path to the root element(s) is displayed in a gray font. The subnodes are therefore the respective subelements of the root elements.
If the left and right subelements were determined as matching, two elements are then represented by a node.
If the right-hand element has another owner, the node is flagged with the icon in front of the stereotype icon.
If the elements have not been recognized as matching, each element gets its own node. The nodes then get given an icon.
Element exists only in the left-hand model in the comparison context and would be deleted in the left-hand model in the merge
Element exists only in the right-hand model in the comparison context and would be created in the left-hand model in the merge
The condition under which two elements have been recognized as matching elements in the left-hand and right-hand models is determined automatically on the basis of the root elements. The comparison takes place for elements of different Innovator models primarily on the basis of their UUID, whereas the elements in different branches of the same Innovator model are compared on the basis of their names in the namespace, with due consideration of case sensitivity (see Sehen Sie hierf�r: "Familiarizing Yourself with Comparison and Merge Concepts").
You can also mark two elements as being matching at a later stage using the context menu. If two elements which are shown as being matching have different names then the node shows both these names. Apart from stereotype icons, all other icons have a tool tip which appears when you hover over them with the mouse pointer.
In the hierarchy area, you can call a comparison window with details for diagrams.
Properties Area
In the right-hand area, all non-filtered properties for the node selected in the hierarchy area are displayed.
- Properties of the element type
- Stereotype properties
- Labels
- Specification texts (F3 texts)
- Type system options (of databases)
The following are displayed for each property in a table with four columns:
- Status with an icon specifying whether the values of the elements match, do not match, or are present only in one of the two elements
- Name of the property
- Value of the left-hand element*
- Value of the right-hand element*
* The property icon is shown in gray if the property value corresponds to the configured default value.
In the properties area, you can call a comparison window with details for textual and enumeration properties.
In Merge mode, you decide here which individual properties should be retained or copied from the right-hand model if these are not being retained or copied in full.
How to Proceed
Prerequisites for Performing a Comparison
At least one root element pair or a change set or a search from the comparison model is required for the comparison.
The right-hand element must come from another model when in Merge mode.
Comparison of Root Elements from Same Model
If you want to compare various root elements from one model you can use the mouse to drag these (e.g. from the model structure) to the left or right root element's selection area.
You can then start the comparison. For the superimposition of elements, the system searches for an identical namespace name exclusively within the right-hand root element. If a hit is found, elements with the same structural ID (the same name in the same namespace) are superimposed.
Comparison of Root Elements from Different Models
The standard scenario for a useful comparison of elements under the root elements concerns models that have a shared origin, so that have the same UUIDs.
Tip
Use the  Quick Compare to easily compare a version of one element with another version in another model.
The standard scenario for a useful comparison of multiple elements under the root elements concerns models that have a shared origin, so that have the same UUIDs. This model is declared the left-hand model.
Then select the root element in the selected model structure or use drag-and-drop to drag the root element from the model structure to the left-hand selection area.
You can use the context menu in the selection area with Root element to add and fill other root elements in the same way.
Alternatively or in addition to the root elements, you can also select change sets or searches from both comparison models.
Select the other, right-hand model using the  Change Model button. If a comparison has already been carried out with this model, the root elements, change sets and searches of this comparison are automatically restored.
Click on the Retrieve the corresponding element in the right model. button to find a corresponding element in the right-hand model using the following search strategies:
- Element with same UUID
- Element with same name under an owner with the same name in the two models
- Element with same element type under an owner with the same name in the two models
If no corresponding root element is found, you can also select a root element directly, e.g. a model structure element with subelements created as a copy in another namespace.
Alternatively, you can drag the root element from a right-hand model opened in parallel to the selection area of the right-hand root element in the editor and drop it there.
You can then start the comparison. The element superimposition strategies described above are applied.
Expanding and Collapsing Branches
When you expand a branch with the [Ctrl] key pressed, expansion takes place recursively to the first level with more than one node.
When you expand a branch with the [Shift] key pressed, expansion takes place recursively to the first node without child nodes.
When you collapse a branch with the [Ctrl]+[Shift] keys pressed, each expanded node in the branch is collapsed.
Supported Procedures in Align Models Editor
This chapter contains the topics:
