A stereotype defines how existing metaclasses can be extended and enables a specific terminology or display (Domain Specific Language) to be used instead of or as well as those used for the extended metaclass.
Properties of a Stereotype
In Innovator, each element that can be a stereotype has a predefined original stereotype. In a profile, such stereotypes («stereotype») can be further specialized. A stereotype can inherit from several other stereotypes. All newly-created stereotypes have at least one generalization.
The stereotype has properties which you can set in the Edit/Properties dialog. These properties primarily affect the appearance of the stereotype.
Note
A stereotype's properties differ from stereotype properties, which you can set for stereotypes.
You can set the following properties for a stereotype:
- Name, icon and color
- Localized name
- Inheritance (for self-defined stereotypes)
- Naming conventions
- Visibility in dialogs (for directly defined or redefined stereotypes)
- Order in dialogs (for directly defined or redefined stereotypes)
- Visibility of type system options (for directly defined or redefined stereotypes)
- Order of type system options (for directly defined or redefined stereotypes)
- Translatable properties (for directly defined or redefined stereotypes)
You need to be in the  Stereotypes view for the following create specifications.
Context
You can create your own stereotypes if you want to use existing stereotypes in Innovator profiles included within the scope of delivery without changing them but require a fundamental extension of the configuration.
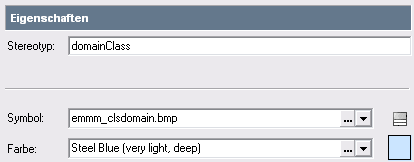
Figure: Properties Tab for a Stereotype
How to proceed
-
Jump to the Stereotypes view.
-
Select the element type (e.g. package) in the profile tree which you want to create a stereotype for.
-
Select
 Create>Stereotype.
The stereotype is created as a specialization of the selected element type. The Edit/Properties dialog appears. The root tab is selected in the tree on the left-hand side.
-
Enter the description of the stereotype in the Stereotype tab.
-
If you want to directly specify the icon or limit the drop-down list, enter the name or name pattern in the Icon check box.
-
Click on the
 button in the Icon check box if you want to select the icon using a selection dialog box.
The Select Icon dialog appears.
-
Select the icon group in the tree on the left-hand side and then the icon you want on the right. Apply it with OK.
-
Click on the
 button in the Icon check box if you want to select the icon using a drop-down list.
 -
Click on the icon you want in the drop-down list.
The icon is displayed to the right next to the check box.
-
If you want to directly specify the color or limit the drop-down list, enter the name or name pattern in the Color check box.
-
Click on the
button in the Color check box if you want to select the color using a selection dialog box.The Color dialog appears.
-
Select the color group from the list on the left-hand side and then the color you want on the right. Apply the changes with OK.
-
Click on the
button in the Color check box if you want to select the color using a drop-down list. -
Click on the color you want in the drop-down list.
The color is displayed to the right next to the check box.
-
If you create an artifact stereotype, specify whether elements of this stereotype can contain files by activating the File Contents can be Checked-In check box.
Context
You can assign localized names to stereotypes. The stereotype is shown in the configuration editor with the logical name. Changes to the localized name can only be made in the dialog.
The model stereotype uses the metaclass' localized name and cannot get a localized name itself.
The stereotype's localized name can be used to show the type. The stereotype's own localized name is used if it has one. If it does not have one, the inheritance hierarchy is searched right through to the root and the first localized name which is found is used. If there is no localized name, the metaclass' localized name is used.
Types specified in this way are used in the model editor in the Help/ What's this?, in Jump>References, in the list for deletion control and in the dialog for changing the name; they are also available for configuring documentation.
The stereotype's logical name is extended in the model browser if the stereotype does not have its own localized name.
How to proceed
-
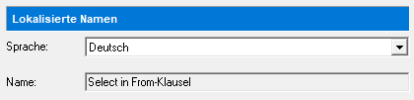
Select the Localized Names entry in the tree on the left-hand side.
-
Select the language from the drop-down list which you want to use for the stereotype's localized name.
-
Enter the name for the stereotype in the selected language.
-
If you wish to use the logical name (again), then delete the localized name.
The localized name is replaced by the logical name where it is used.
Prerequisites
You have created the stereotype yourself.
Context
Set which element type or stereotype the stereotype will be derived from. Multiple inheritance is also possible.
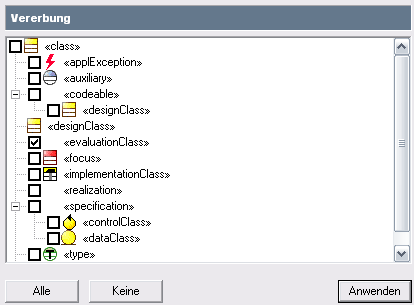
Figure: Tree for Selecting Super Stereotypes with the Option of Multiple Selection
How to proceed
-
Select the Inheritance entry in the tree on the left-hand side.
-
Activate the check boxes next to the stereotypes which the stereotype should inherit from (properties, labels, specifications, naming constraints) in the tree on the right-hand side.
Context
This means you can set whether case sensitivity is relevant, whether they should have a certain minimum or maximum length and in what respect the name has to be unique when naming model elements.
For elements with short names (for example, entities, views, their attributes, processes, and tasks), naming constraints can be configured separately for short names (short name constraints) and for short names with consideration of the names (constraints for short name and name).
The range of name verification means that uniqueness can be controlled step-by-step.
-
No extended verification
Verifying the name for uniqueness is restricted to the immediate container without considering imports.
Only this value appears for named elements; other values can be selected for elements in the namespace. Named elements do not have to have unique names. Elements within the namespace must have at least one unique name within the direct namespace.
-
Consider only elements defined in the namespace
Verifying the name for uniqueness is restricted to the immediate container, i.e. for operations it is carried out within the class and for parameters within the operation. However, it does take account of the names of imported elements.
There are a few exceptions for which the immediate container is not the namespace but a level of a more remote container; for example, the namespace of a state is formed by the state machine and not by the region which is represented by the immediate container. As a result, states can be moved to another region without having to be renamed.
-
Unique in the current model
The (sub)model is the third level in the Innovator model: <Innovator model>::<System model>:<Model>.
Unique naming in the current model simplifies communication within the level being viewed of the respective model. However, the same name can be allocated to other elements of the same type in other submodels.
-
Unique in the current system model
The system model is the second level in the Innovator model: <Innovator model>::<System model>.
Unique naming in the current system model simplifies communication within the level being viewed of the respective system model. However, the same name can be allocated to other elements of the same type in other system model.
-
Unique in the entire Innovator model
This means the Innovator model within a repository, i.e. the unit that you open and which you log into as a user.
Certain element types occur in various methods. Uniqueness in the entire Innovator model and corresponding naming conventions can be used to assign elements more easily using simply the name. On the other hand, ambiguity may be unavoidable as certain names cannot be freely chosen.
You can define patterns for names using regular expressions. Stereotypes inherit these name patterns and can then add requirements to these inherited naming constraints.
-
Inherited
Displays the inherited naming conventions.
-
Match also
You can use regular expressions to formulate the naming conventions for the stereotype here.
Examples:
Classes: ^[A-Z][A-Za-z0-9]*$ (only letters and numbers, always starting with capitals)
Methods: ^[a-z][A-Za-z0-9]*$ (only letters and numbers, always starting with lowercase letters)
Exclusion of certain characters: ^[^-].*$ (no hyphens at the start, otherwise any characters)
Exclusion of certain strings: ^(?!string).*$ ("string" cannot be at the start, otherwise any)
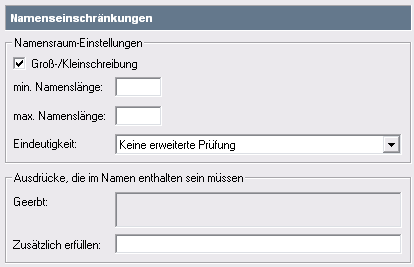
Figure: Naming Constraints Tab
How to proceed
-
Select the Naming Constraints entry in the tree on the left-hand side.
-
In the Namespace Settings group, set:
-
Case Sensitivity check box: case sensitivity is taken into consideration when verifying the uniqueness of a name.
-
Min. input field Name length: minimum name length
-
Max. input field Name length: maximum name length
-
Uniqueness drop-down list: range of name verification
-
-
In the Regular Expressions that Name Must Contain group, you can see/set:
-
Inherited info field: regular expressions which need to be contained because of the inheritance
-
Match alsofield: regular expression which the name also needs to contain
-
As with the naming constraints, there is a tab for ID constraints for requirements.
Context
Restriction
The tab is only displayed if the stereotype is directly created or redefined in the profile.
All properties (properties, stereotype properties, type system options) which are available will be able to be changed for an element. If it does not make sense to use certain properties in a special context there is the option of constraining the list of available properties. By default, the (Nicht definierte Variable:UIVar_Win.PropStereotype) property is hidden as of Version 14.0, for example, since it can be modified only in exceptional cases, and usually depicts redundant information.
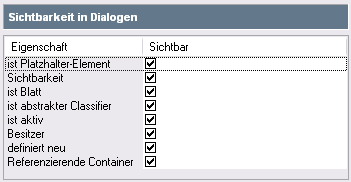
An element's list of visible properties is controlled via the stereotype in its Visibility in Dialogs or Visibility of Type System Options tab. All properties, stereotype properties and type system options which are available for the stereotype being viewed can be found in there.
All properties (apart from (Nicht definierte Variable:UIVar_Win.PropStereotype)) are marked as visible as standard. If you reset the selection for a property it will no longer be visible in an element’s Properties tool window and cannot be changed.
Visibility setting is inherited via the stereotype's generalizations. A property which was deselected by a super stereotype can no longer be selected by a substereotype.
Visibility constraint for properties is not evaluated within create templates to a stereotype. This means that values which are not visible for the created element and can therefore not be modified can be set for a property in a template.
Figure: Visibility in Dialogs Tab
How to proceed
-
Select the Visibility in Dialogs or Visibility of Type System Options entry in the tree on the left-hand side.
-
Deactivate the property's check box in the Visible column to hide the stereotype's property in the Properties tool window.
You have hidden the stereotype's property.
-
Activate the check box in the Visible column to show the stereotype's(Nicht definierte Variable:UIVar_Win.PropStereotype) property in the Properties tool window which is hidden as standard.
You have shown the stereotype's (Nicht definierte Variable:UIVar_Win.PropStereotype) property.
You have created the stereotype and set its properties.
Context
Restriction
The tab is only displayed if the stereotype is directly created or redefined in the profile.
An element's order of visible properties is controlled via the stereotype in its Order in Dialogs or Order of Type System Options tab. It always contains all visible properties, stereotype properties and type system options so that you can specify their order.
The name is always shown in a set position in the Properties tool window. The setting for this property only refers to the order in table editors.
Order setting is inherited via the stereotype's generalizations.
How to proceed
-
Select the Order in Dialogs or Order of Type System Options entry in the tree on the left-hand side.
-
To move the stereotype's property up or down one in the Properties tool window, select the respective entry and click on
 or
or  .
.You have moved the stereotype's property.
-
To insert a separator after the selected entry, click on
 .
.The separator is inserted and displayed in the Properties tool window. If necessary, press [F5].
-
To remove a separator, click on
 .
.The separator is removed.
You have created the stereotype and defined its visible properties and their order.
Context
Restriction
The tab is only displayed if the stereotype is directly created or redefined in the profile.
The properties which should be translated in the model editor can be marked for a stereotype. All real properties, stereotype properties, labels and texts that can be translated for elements of this stereotype are listed.
The configuration inherits the settings from the stereotype's generalization. The settings can be redefined in another profile using Stereotype Redefinition.
Labels and texts can also be defined generally or for element types without stereotypes. Labels and texts also have the "is translatable" property so that translation can be controlled in these cases as well If the property is not set, then labels and texts are also not taken into consideration in the Translatable Properties tab. Unformatted hidden text cannot be translated.
How to proceed
-
Select the Translatable Properties entry in the tree on the left-hand side.
-
Activate the check box for the applicable property to mark it as translatable.
You have marked the stereotype's property as translatable. It can be translated internally in the model editor (Translation tool window) or externally (Export/Import).
-
Deactivate the check box for the applicable property to mark it as untranslatable.
You have marked the stereotype's property as untranslatable. It does not appear for translation.
