The Word add-in, Innovator Office Integration, was created to enable you to create requirements and use cases in the Microsoft Word environment you are used to using. You do not even have to be connected to an Innovator model to be able to create requirements and use cases in Word. You can also edit requirements and use cases which already exist in Innovator using Word and then synchronize them with the Innovator model again.
Connecting to a Model
You first need to connect to an Innovator model to be able to edit requirements and use cases in this model. You can connect to any number of models at the same time. The current model is shown in the Connected models: drop-down list in the Requirements and Use Cases tab in the Innovator for Microsoft Word tool window; all of the model's requirements and use cases are shown below it. You can only interact with the model currently selected at the time.
Synchronizing Your Work with the Model
Synchronization
Synchronization is the process which saves changes you have made to requirements and use cases in the Word document to the Innovator model and, vice versa, updates the Word document with changes made in the model.
If you modify an online requirement in the Word document, you will notice that the requirements table in the tool window for this requirement has the status Modified in the document. This shows you that you need to upload changes to requirements and use cases in the model. Use the Innovator> Model>Synchronize command to start the synchronization process to apply these changes.
Requirement State
There are six different states in the Innovator tab in the Innovator for Microsoft Word tool window for displaying requirements and use cases. These states relate to the current Word document. If you have other Word documents with the same requirements and use cases, then you need to open these to verify the state of the requirements and use cases in these documents.
| Icon | State | Brief Description |
|---|---|---|

|
Only in model | This requirement only exists in the Innovator model and is not added to the current Word document. You can still edit these requirements and use cases. |

|
Only in document | This is normally a new requirement that was inserted into the Word document but was not yet synchronized with the Innovator model. If an Innovator user deletes a requirement from the Innovator model but this requirement exists in a Word document, then Innovator Office Integration shows the requirement as "Only in document". |

|
Synchronized | The requirement exists both in the Innovator model and the Word document. All of the information for this requirement is exactly the same as that in the Innovator model at the point when the last synchronization or refresh took place. |

|
Modified in document |
The requirement exists both in the Innovator model and the Word document. There are some changes in the Word version that need to be transferred to (synchronized with) the Innovator model. A requirement can also be in this state if ...
|

|
Modified in model | The requirement exists both in the Innovator model and the Word document. There are some modifications in the repository that need to be transferred (synchronized) and the Word document needs to be updated. |

|
Conflict | The requirement exists both in the Innovator model and the Word document. There are some changes for this requirement in both the model and Word document. The resulting conflict needs to be manually resolved. |
Synchronizing an Offline Element without Subelements
Prerequisites
Please ensure the following:
- Innovator Office Integration is connected to at least one Innovator model and this is selected in the Connected models: drop-down list in the Models tab in the Innovator for Microsoft Word tool window.
- The offline element is situated below an appropriate anchor (of the connected model) in the Word document
- An element template from the connected model is assigned to the offline element
Context
If you synchronize the offline element, it is added to the connected Innovator model.
How to proceed
-
Place the mouse pointer within the offline requirement you want to synchronize.
-
Select the Innovator>Model>Synchronize menu command.
The offline requirement is added below the last subelement directly below the anchor which was added in the previous step. In this step, the requirement is assigned the model element as super element, is provided with a UUID and the stereotype for which the template has been created.
Synchronizing an Offline Help
If you assign an offline requirement that is part of a hierarchy a template from a model, then a dialog opens that shows the hierarchy of the offline elements, including the selected offline requirement.
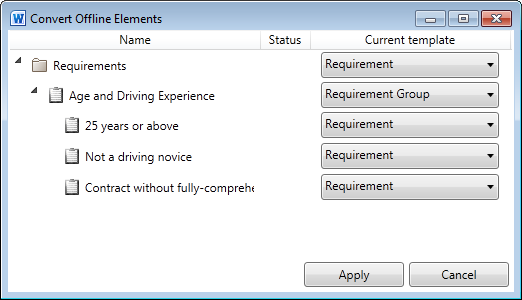
The hierarchy root is the offline requirement that is the anchor's subelement. You can select a template for each offline requirement. The template that opens the dialog when selected is used as default. The next permissible template is selected if a template cannot be used for the selected requirement. If you click on Apply, the online templates are applied sequentially to the requirements and use cases according to the hierarchy level. You can check the progress in the Status column. The dialog closes once the process is completed.
Note
You can open the dialog when the anchor is selected. In this case, the command is called Bulk convert offline elements and the anchor itself becomes the root node in the dialog window. The drop-down list for templates that can be used can be selected for the anchor. This gives you the simple option of doing a bulk convert for all offline requirements and use cases via the anchor.
