The Beamer tool window supports the role-based, flexible and transparent mapping of elements and can be configured in many ways.
Purpose
The Beamer tool window is used for:
- Creating new model elements from existing model elements and optionally connecting them by means of a relationship
- Creating a relationship for existing elements
- Creating new model elements from existing model elements and deleting the source elements
The tool window supports the role-based, flexible and transparent mapping of elements and can be configured in many ways.
Call
Open the Beamer tool window in the Extras ribbon tab.
Structure
Figure: Beamer Tool Window
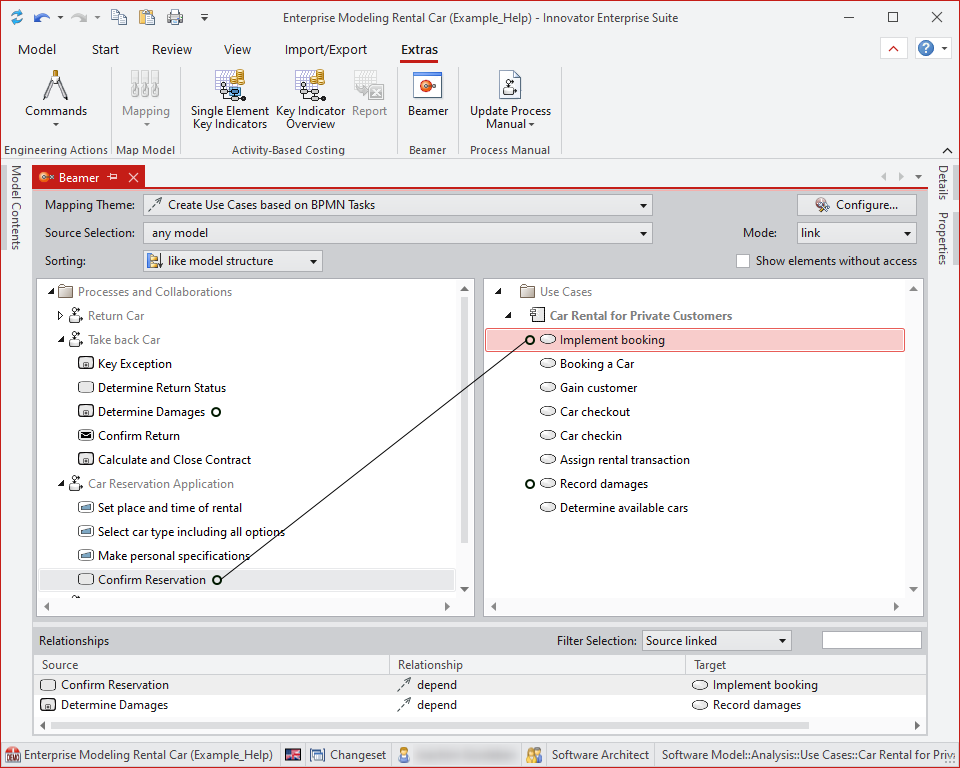
The Beamer tool window consists of the top mapping area, with a tree structure for the source and target area, and the bottom Relationships area.
- Mapping area
-
Mapping Theme Drop-Down List
Select the mapping theme here.
The display is narrowed to all configured topics that are available to the current role.
-
Configure... button
The button opens the Configure Mappings dialog where you can compile mapping themes.
-
Source Selection Drop-Down List
If the selected mapping theme allows mappings for multiple stereotypes, you can restrict the displayed elements in the source area with a selection other than Any Model.
The left-hand tree is then adjusted and elements of the chosen type are displayed.
-
Mode Drop-Down List
Select which procedure is used for drag-and-drop here.
The mode switches between:
-
Create
This mode offers the creating actions CopyLink, Copy and Move from the mappings of the theme.
-
Link
This mode offers the connecting actions CopyLink and Link from the mappings of the theme. Alternatively, it can relate to the subelements.
A: In a simple drag-and-drop, the dragged source elements are linked with the target element.
B: In a drag-and-drop with the [Alt] key pressed, the dragged source elements are linked with the direct, identically named subelements of the target element. If there are no subelements of the same name or if these are already linked, a corresponding message is displayed.
The CopyLink action type is part of both modes, which makes handling more flexible. In Create mode, you obtain an element and a relationship; in Link mode, you obtain a relationship with an existing element or its subelements.
The selection in this drop-down list defines which elements are displayed in the right-hand tree.
Restriction
The use of the action types in a mapping theme must ensure a unique effect in both mapping modes in the Beamer tool window.
It only makes sense to define different mappings of the same initial stereotype in a mapping theme if one action is used exclusively and uniquely per mode. The simultaneous use of concurrent action types in a mode (e.g. CopyLink and Move) can cause unexpected results.
To enable concurrent actions on the same initial stereotype, separate mapping themes must be defined.
-
-
Sorting Drop-Down List
You can see the trees as they are in the model structure or sorted alphabetically.
The setting is stored for the user.
-
Show elements without access check box
Elements and relationships which you do not have access to are also shown in the trees and tables.
The setting is not stored.
-
Source Area
In a mapping theme, a source root and target root that are compatible with the configured mappings should be selected.
Once such a mapping theme is selected in the source area, elements in the mapping theme's source root which correspond to the source selection and mode are initially shown.
You can drag another source root into the source area.
-
Target Area
In the target area, elements in the mapping theme's target root which correspond to the mode are initially shown.
You can drag another target root into the target area.
-
- Relationship Area
-
Filter Selection Drop-Down List
With this filter selection, you restrict the list of relationships.
-
unfiltered
The list of relationships is not restricted.
-
Selection
The selected relationships are displayed.
-
Source Not Linked
The source elements without a relationship to target elements are displayed.
-
Source Linked
The source elements with one or more relationships to target elements are displayed.
-
-
Relationships List
The list of relationships displays existing mappings of the selected theme in accordance with the filter selection. The initial element, relationship and target are shown respectively.
When mappings are selected (multiple selection is possible), the corresponding edges are shown in the mapping area.
-
Use
Display
When you select one or more elements in the source or target area, its relationships are displayed provided that the other involved elements are in the visible area.
To make hidden relationships of this element visible, select the desired relationship in the Relationships list.
Selection
Source and Target Area
In the trees, you can select one or more element, left or right.
Once this happens, all displayable relationships for these elements are indicated by lines in the trees. This does not necessitate a change in the currently visible compartment.
To restrict the Relationships list to relationships of the selected element and to consider these relationships in a targeted manner, select the Selection filter.
In the Relationships list, all relationships of the selected elements are shown in gray, including those that are not displayed in the tree.
List Relationships
You can select one or more lines in the Relationships list. All involved elements are shown in gray in the trees and are made visible with their relationships as long as the size of the window permits this.
In the Filter Selection drop-down list, you can restrict the display of the Relationships list in order to see only the relationships of selected elements, for example.
For copy themes, the element itself is displayed in the list instead of relationships.
Drag-and-Drop
Drag one or more black nodes from the left-hand tree to a black node in the right-hand tree. Note the enhanced option in Link mode.
If you hover for a relatively long period of time over a collapsed node, the node expands, offering access to the next level.
If you hover for a relatively long period of time at the top or bottom margin in the right-hand tree, the view scrolls upwards or downwards.
If you accidentally start a drag operation, you can release the mouse button in any position where no drop mouse pointer appears in order to terminate the operation.
