The Synchronize dialog is used to adjust requirements and use cases in the document and model.
Purpose
The Synchronize dialog is used to adjust requirements and use cases in the document and model.
Open the Synchronize dialog in the Model group using the Synchronize command.
Structure
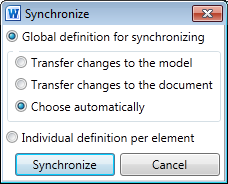
There are two basic options in this dialog:
- Global definition for synchronizing
Synchronizes all requirements and use cases using presets.
Global synchronization uses one of the following modes:Transfer changes to the model
Local changes are adopted in the model. Values in the model are overwritten.
Transfer changes to the document
Changes made in the model are adopted in the document. Overwrites local changes.
Choose automatically
Changes made in the model are adopted in the document and changes made in the document are adopted in the model.
- Individual definition per element
Synchronizes all requirements and use cases using user-defined settings.
Open the Action column in the Innovator for Microsoft Word tool window and select the synchronizing action for each row.No action
Does not modify the requirement in Word or in the Innovator model.
Send to model
Transfers local requirements to the model. Values in the model are overwritten.
Get from model
Gets the model changes and overwrites local changes.
Synchronize Globally
Context
For global synchronization of all requirements and use case descriptions, make use of presets.
How to proceed
-
Select Innovator>Model>Synchronize.
The dialog of the same name appears.
-
Activate the Global definition for synchronizing radio button.
-
Activate the radio button for the desired synchronization mode.
-
Click on Synchronize.
All elements are synchronized on the basis of the selected mode.
Synchronize Individually
Context
For individual synchronization of requirements and use case descriptions, make use of synchronization actions, which you can set in advance for the individual elements.
How to proceed
-
Open the Innovator for Microsoft Word tool window.
-
Jump to the Elements tab.
-
In the Action column in the Tree tab, select the synchronization action for the respective element.
-
Select Innovator>Model>Synchronize.
The dialog of the same name appears.
-
Activate the Individual definition per element radio button.
-
Click on Synchronize.
All elements are synchronized on the basis of their previous individual settings.
