Creating an Activity Partition
An activity partition is used to split an activity into areas with common properties such as responsibility, role, subsystem.
Creating an Activity Partition
Prerequisites
You have created an activity.
Context
You can split an activity graphically into either vertical or horizontal areas with common properties.
Assigning actions and other elements to this activity partition is carried out implicitly by the positioning of the elements within the activity partition.
If you use activity partitions, the overall activity will always be divided into one or more activity partitions.
As an alternative to activity partitions, it is also possible to explicitly assign actions to particular activity groups.
Innovator supports vertical, horizontal and hierarchical activity partitions.
Note
In the case of horizontal modeling, activity partitions must always take up the entire width of an activity. This is why it is not possible to change the width in Innovator directly – instead, the width is always adjusted to fit the activity. It is possible to modify the height of an activity partition. This automatically adjusts the height of the surrounding activity.
This also applies to changed directions for vertical modeling.
How to proceed
-
Position the mouse pointer in the activity frame and select the
 Vertical activity region template from the mini toolbar in the context menu.
The activity partition is inserted and automatically encompasses the entire activity. The name of the activity partition is automatically selected to be edited.
A new action is created in the diagram. The lane is inserted and automatically encompasses the entire process. The name of the action is automatically selected to be edited.
-
Enter the name for the action and confirm with the [Enter] key.
Inserting More Activity Partitions into an Activity
Context
You can model multiple activity partitions next to each other. However, it is also possible to nest activity partitions hierarchically. When inserting further activity partitions, it therefore depends where you want to position the additional activity partition. The following describes how to proceed for horizontal modeling. Vertical modeling is carried out in the same way.
How to proceed
-
Drag an activity region from the Create Diagram Content gallery into the activity, moving the mouse over an existing activity region.
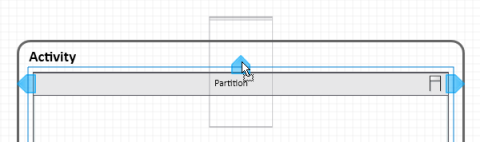
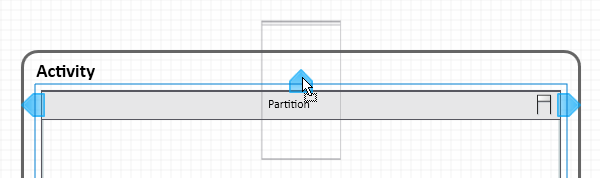
Multiple insertion points (arrow points) are shown on the activity partition:
-
Let go of the mouse button where you want to insert the new activity region:
-
drop it on the arrow pointing upward to insert the new activity partition so that the existing activity partition is nested hierarchically within it (see figure)
-
drop it within an existing activity partition to insert the new activity partition such that it is nested hierarchically within the existing partition
(You can also do this using the appropriate template from the mini toolbar.)
-
drop it on the arrow pointing left to insert the new activity partition to the left of the existing activity partition
-
drop it on the arrow pointing right to insert the new activity partition to the right of the existing activity partition
-
Moving an Activity Partition
How to proceed
-
Move an activity partition that you have already inserted within the existing arrangement by dragging and dropping it onto one of the blue arrow points on another activity partition or within another activity partition.
