By means of an example, you will learn how you can program a verification in C# and then integrate it into Innovator using the verification configuration.
The Example
Note
You can find further examples in the plug-in samples. Installation of the plug-in samples is explained in the "Installing Plug-In Samples" topic.
In the following example from the area of BPMN, a check needs to be made as to whether the business objects at the input or output data objects of a call activity match the business objects at the data objects of the called process. In the event of an error, a self-defined message is displayed as a warning in Innovator.
This sort of mismatch of the business objects can occur e.g. as follows: you have created a call activity with an output data object to which a business object 1 is assigned. However, no data object of the called element has yet been set at the output data object. In the called process, you have created an output data object to which another business object 2 is assigned. As soon as the two output data objects connect with one another, when you set the data object for the element called or being called, this leads to a mismatch as different business objects are referenced.
How to proceed
To create a verification, proceed as follows:
- Program the single verification in C# and
- Integrate the programmed C# verification into Innovator using the verification configuration file $INODIR/inoverify.xml.
The verification will then be available for use in Innovator and you can call it in the Verification Wizard for any element set of your choice. The verification results and the configured error message can be found in the Verification Results tool window.
Programming the C# Verification
Prerequisites
A verification should be designed in such a way that it always corresponds precisely to a verification message.
Context
The goal is to create a C# class library that contains the single verification.
How to proceed
-
Create a new project in Visual Studio using the "Class Library" project template. Select .NET 8.0 as the framework.
-
Select "Windows" in the project properties as the target operating system.
-
Create references to the following Innovator libraries that are located in MID.Innovator.API.dll, MID.Innovator.Core.Util.dll and MID.Innovator.WorkAreaContent.Verification.dll. Each with its respective deactivated local copy.
-
Give suitable names to your library, namespace and verification class, e.g. CSharpSampleVerification or VerifyCallActivities.
Note
Please note that you must declare the class public.
-
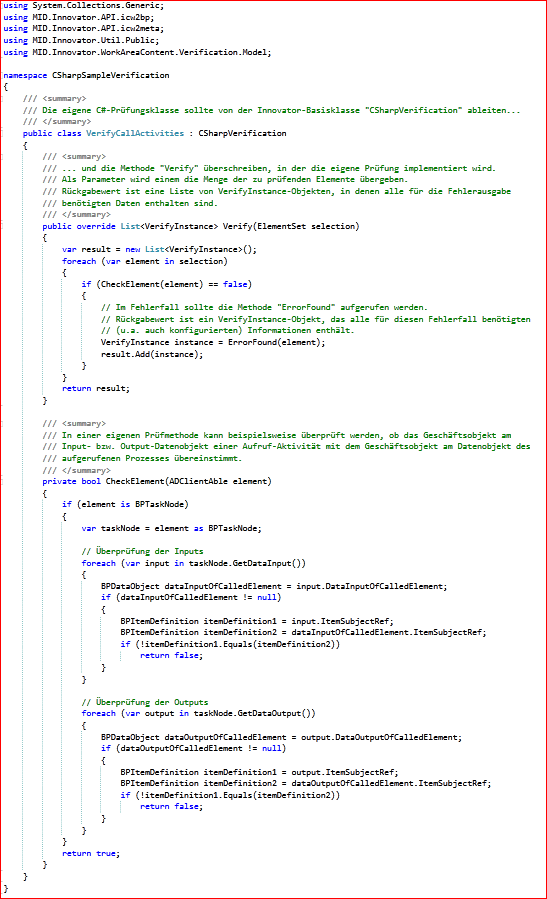
Derive your VerifyCallActivities verification class from the CSharpVerification Innovator base class.
Note
The CSharpVerification Innovator base class is defined in the MID.Innovator.WorkAreaContent.Verification.Model namespace, which you need to incorporate into your file by means of a using statement.
-
Define a Verify method in your verification class which will overwrite the base class' Verify methods.
Note
The Verify method receives the set of model elements to be verified as a transfer parameter.
-
Use the Verify method to implement your own check algorithm on the set of elements to be verified.
You can create a custom verification method for this, for example, which checks each individual element in the verification set iteratively.
-
If this does not work, then open the ErrorFound method which is defined in the CSharpVerification base class; you must enter the defective element as parameter.
Note
The ErrorFound method returns an object of the class VerifyInstance which contains all the information needed for the error message. You should collect these objects in a list.
-
Your Verify method should have the list of VerifyInstance objects as a return; you received these when calling the ErrorFound method.
-
Translate your code and copy the C# class library to the installation directory's /Plugins subdirectory.
For the above example, the implementation of the verification class could look as follows:
Configuring the C# Verification
Prerequisites
You have available a programmed verification as C# class library.
Context
The goal is to integrate the programmed single verification so that it is available in Innovator.
How to proceed
-
Open the $INODIR/inoverify.xml verification configuration using a text editor or an XML editor.
Note
If this file is not available, create it following the instructions on ""Configuring Your Own Verification Actions"" page.
-
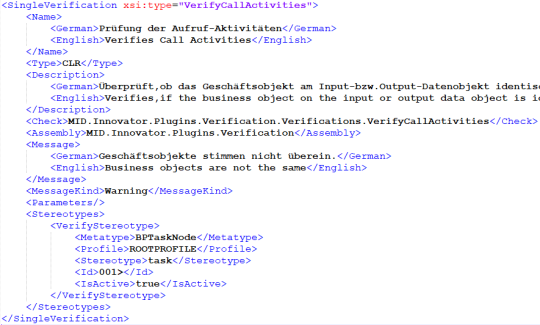
Create a verification (SingleVerification XML element) under the Singles XML element.
-
Enter a localized name for your C# single verification (Name XML element).
Note
You can use this name to identify and call the single verification in Innovator.
-
As type of verification (Type XML element), specify CLR as the verification is implemented in C#.
-
Enter a localized description of the single verification (Description XML element).
Note
This description can be found again as a tool tip for single verification on the page for the Verification Wizard for selecting verifications.
-
Specify the qualified name of the C# class being implemented (Check XML element) (in our example, MID.Innovator.Plugins.Verification.Verifications.VerifyCallActivities).
-
Specify the .NET class library of the C# class being implemented (Assembly XML element) (in our example, MID.Innovator.Plugins.Verification).
-
Specify a localized message text that will be displayed in the results window in the event of error (Message XML element).
-
Specify the type of message that will be displayed in the results window in the event of error (MessageKind XML element) (in our example, Warning).
-
Specify the stereotypes having model elements for which the verification should be applicable (Stereotypes XML element with the subordinate VerifyStereotype XML element), in particular the element type of the stereotype (MetaType XML element), the defining profile of the stereotype (Profile XML element), the name of the stereotype (Stereotype XML element), a verification number (Id XML element) and whether the verification is active for this stereotype (IsActive XML element).
-
Enter the parameters which the verification require. (Parameters XML element with the subordinate VerifyParameter XML elements). These parameters are then available the methods. They consist of the parameter (Name XML element) and the value of the parameter (Value XML element).
-
Save and close the verification configuration file.
For the above example, the configuration of the implemented verification class could look as follows: