It is normally possible for a user to change the size of nodes.
Changing the Size of a Node as a User
The user can normally change the size of a node. The type of node determines what the user can change.
Nodes which only show an icon, e.g. an event or a gateway in a BPMN diagram, cannot have their size changed by a user.
Do not confuse this with displayed names (labels) of such nodes. Names are shown outside of the node and are nodes themselves. Label nodes for node or edge names can be expanded as required in any direction e.g. so that the layout is not altered for various display languages. Size is changed in both directions (left and right or up and down) using a central text alignment.
Use cases are nodes which have a fixed page aspect ratio. The user can change the size of the node but the exact height and width is automatically set based on the page aspect ratio; the raster normally means that the page aspect ratio cannot be exactly maintained.
The user can normally change the height and width of nodes which can contain other nodes or edges themselves (container nodes). (Examples: process, task, class)
The lane in the BPMN diagram is an exception to this. You can only change its height. Its width depends on the width of the owning node (normally a process). Another feature of the lane is that when the height is changed, the height of the owning node is also changed.
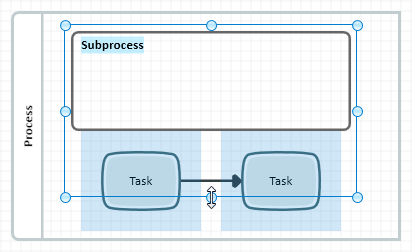
You can decide whether suitable elements should be assigned to the container or not when changing the size for certain container nodes (e.g. use cases to a use case system or tasks to a subprocess).
How Can the User Change the Size of a Node?
The node needs to be selected and the diagram reserved.
The node has a selection rectangle round it. There will be handles on the selection rectangle if you can change the size of the node.
The Design>Arrange>Optimize>Optimize Size (F8) command is active in the ribbon.
When you change the node size in diagrams, you are supported by the display of horizontal and vertical lines which indicate alignment with adjacent nodes. If the space between the elements is the same, this is shown if there are more than two elements.
The user can change the size in the following ways:
-
By optimizing the size of a node and retaining the position of the top left handle
Select the node and select Default (F7).
The command is applied to all diagram elements if no selection is made.
-
By optimizing the size of a node and retaining the position of the selected handle
Double-click on one of the handles on the selection rectangle.
-
By changing the size of a node in a certain direction
Click on one of the handles in the selection rectangle with the mouse and move it.
-
By using centric node sizing (vertical, horizontal or central)
Hold down the [Ctrl] key, click on one of the handles in the selection rectangle using the mouse and move it.
-
By moving the border between two adjacent lanes or regions
Hold down the [Shift] key, click on the handle, lanes or regions with the mouse and move it.
-
By changing the size of a surrounding container to the right or below
Click in a container node to the left of the right-hand border or above the bottom border and increase the size of the container node. Nodes outside of the container nodes are moved.
-
By changing the size of the surrounding container by including/excluding nodes
Hold down the [Shift] key, click on one of the handles in the selection rectangle using the mouse and move it. Nodes that are included by expanding the container node are marked in blue. Nodes that are excluded by decreasing the container node are marked in red. This is only possible if the nodes can be moved in the container.
Optimizing the Size
Use Optimize Size (F8) to make the node as small as possible while ensuring that none of the content is hidden.
Long text within the node is wrapped. The text is not wrapped if it is smaller than 20 raster. Text which is longer than this is wrapped at blank spaces. If the text does not have any blank spaces, the text is wrapped at 50 raster or less. Hard returns are always wrapped, e.g. those that the user can insert in comments.
Optimizing Header Size
So that nodes are not accidentally moved to a container (concepts, collaborations, processes, lanes, participants, structured classifiers etc. displayed as containers) which has content, the name is shortened and ends with "..." if the container node's header (e.g. name change, icon display) would be longer than the current size.
Use the Design>Arrange>Optimize>Optimize Header Size (Ctrl+Shift+F8) command to view the full name. The name is split over multiple lines and the header size adjusted accordingly. The content of the container is not moved if possible. Use the command to make the header of a lane as small as possible while ensuring that none of the node content is hidden.
Long text within the node is wrapped. The text is not wrapped if it is smaller than 20 raster. Text which is longer than this is wrapped at blank spaces. If the text does not have any blank spaces, the text is wrapped at 50 raster or less. Hard returns are always wrapped, e.g. those that the user can insert in comments.
The command is carried out on all selected containers; if no selection is made, then the command applies to all containers.
Double-Clicking on the Handle
Double-clicking on a handle makes the node as small as possible; the size is only changed to a size which could also be achieved by dragging the handle. e.g. double-clicking on the middle handle on the right-hand side means the node's height remains the same. Only the width is changed.
Changing the Size Automatically
All nodes are checked when a diagram is loaded to see if they are so small that contents would be covered. This can happen e.g. when one of the properties has been changed for the element shown so that it now needs to show additional information. If a node is too small, its height is increased.
